If you just want the sample, right click this link, save as, rename to zip and extract.
You can use your HTML 5 browser to capture video and photos. That is if your browser supports this feature (at the time of this writing, this example works well on Firefox and Chrome but not IE11).
I have followed some good references on the internet on how to do that, but I also needed some implementation on how to take a “passport” photo and upload the result. This is the intention of this post.
Steps:
- Capture video and take snapshot.
- Display target area.
- Crop the photo to a desired size.
- Upload the result to the server.
Step 1: Capture video and take snapshot.
This step relies mainly on the Eric Bidelman’s excellent article. After consideration I decided not to repeat the necessary steps for taking a snapshot using HTML 5, so if you require detailed explanation please read his good article. However the minimum code for this is pretty much straight forward so consider reading on. What you basically need is a browser that supports the video element and getUserMedia(). Also required is a canvas element for showing a snapshot of the video source.
<!DOCTYPE html>
<html>
<head>
    <title></title>
</head>
<body>
    <video autoplay width="320" height="240"></video>
    <canvas width='320' height='240' style="border:1px solid #d3d3d3;"></canvas>
    <div>
        <input type="button" value="start capture" onclick="startCapture()" />
        <input type="button" value="take snapshot" onclick="takePhoto()" />
        <input type="button" value="stop capture" onclick="stopCapture()" />
    </div>
    <script type="text/javascript">
        var localMediaStream = null;
        var video = document.querySelector('video');
        var canvas = document.querySelector('canvas');

        function takePhoto() {
            if (localMediaStream) {
                var ctx = canvas.getContext('2d');
                ctx.drawImage(video, 0, 0, 320, 240);
            }
        }

        navigator.getUserMedia = navigator.getUserMedia || navigator.webkitGetUserMedia || navigator.mozGetUserMedia || navigator.msGetUserMedia;
        window.URL = window.URL || window.webkitURL;

        function startCapture() {
            navigator.getUserMedia({ video: true }, function (stream) {
                video.src = window.URL.createObjectURL(stream);
                localMediaStream = stream;
            }, function (e) {
                console.log(e);
            });
        }

        function stopCapture() {
            video.pause();
            localMediaStream.stop();
        }
    </script>
</body>
</html>
Several points of interest:
- Line 7: Video element for showing the captured stream. My camera seems to show a default of 640×480 but here this is set to 320×240 so it will take less space on the browser. Bear this in mind, it’ll be important for later.
- Line 8: Canvas element for the snapshots. Upon clicking ‘take photo’, the captured stream is rendered to this canvas. Note the canvas size.
- Line 22: Drawing the snapshot image onto the canvas.
- Line 26: Consider testing support for getUserMedia.
- Line 30: Capture video.
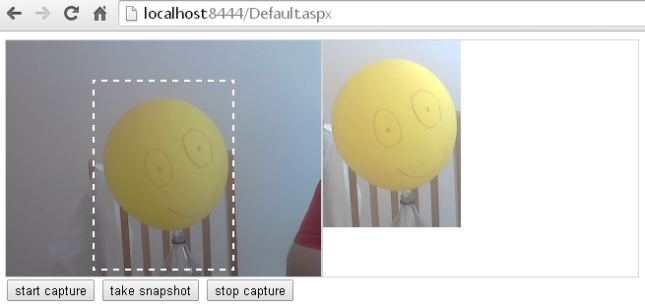
The result, after starting a capture and taking a snapshot (video stream is on the left, canvas with snapshot is to the right):
Step 2: Display target area.
As the camera takes pictures in “landscape”, we will attempt to crop the image to the desired portrait dimensions. Therefore the idea is to place a div on top of the video element to mark the target area, where the head is to be placed.
The code:
<!DOCTYPE html>
<html>
<head>
    <title></title>
    <style type="text/css">
        .container {
            width: 320px;
            height: 240px;
            position: relative;
            border: 1px solid #d3d3d3;
            float: left;
        }

        .container video {
            width: 100%;
            height: 100%;
            position: absolute;
        }

        .container .photoArea {
            border: 2px dashed white;
            width: 140px;
            height: 190px;
            position: relative;
            margin: 0 auto;
            top: 40px;
        }

        canvas {
            float: left;
        }

        .controls {
            clear: both;
        }
    </style>
</head>
<body>
    <div class="container">
        <video autoplay></video>
        <div class="photoArea"></div>
    </div>
    <canvas width='320' height='240' style="border: 1px solid #d3d3d3;"></canvas>
    <div class="controls">
        <input type="button" value="start capture" onclick="startCapture()" />
        <input type="button" value="take snapshot" onclick="takePhoto()" />
        <input type="button" value="stop capture" onclick="stopCapture()" />
    </div>
    <script type="text/javascript">
        var localMediaStream = null;
        var video = document.querySelector('video');
        var canvas = document.querySelector('canvas');

        function takePhoto() {
            if (localMediaStream) {
                var ctx = canvas.getContext('2d');
                ctx.drawImage(video, 0, 0, 320, 240);
            }
        }

        navigator.getUserMedia = navigator.getUserMedia || navigator.webkitGetUserMedia || navigator.mozGetUserMedia || navigator.msGetUserMedia;
        window.URL = window.URL || window.webkitURL;

        function startCapture() {
            navigator.getUserMedia({ video: true }, function (stream) {
                video.src = window.URL.createObjectURL(stream);
                localMediaStream = stream;
            }, function (e) {
                console.log(e);
            });
        }

        function stopCapture() {
            video.pause();
            localMediaStream.stop();
        }
    </script>
</body>
</html>
As you can see, the code was modified to place the dashed area on top of the video. Points of interest:
- Lines 20-27: note the dimensions of the target area. Also note that the target area is positioned horizontally automatically using ‘margin’.
- Line 41: The dashed area.
Step 3: Crop picture to desired size.
Luckily the drawImage() method can not only resize a picture but also crop it. A good reference on drawImage is here, and the very good example is here. Still, this is tricky as this isn’t an existing image as shown in the example, but a captured video source which is originally not 320×240 but 640×480. It took me some time to understand that and figure out that it means that the x,y,width and height of the source arguments should be doubled (and if this understanding is incorrect I would appreciate if someone can comment and provide the correct explanation).
As cropping might be a confusing business, my suggestion is to first “crop without cropping”. This means invoking drawImage() to crop, but ensuring that the target is identical to the source in dimensions.
function takePhoto() {
    if (localMediaStream) {
        var ctx = canvas.getContext('2d');
        // original draw image
        //ctx.drawImage(video, 0, 0, 320, 240);

        // crop without cropping: source args are doubled;
        // target args are the expected dimensions
        // the result is identical to the previous drawImage
        ctx.drawImage(video, 0, 0, 640, 480, 0, 0, 320, 240);
    }
}
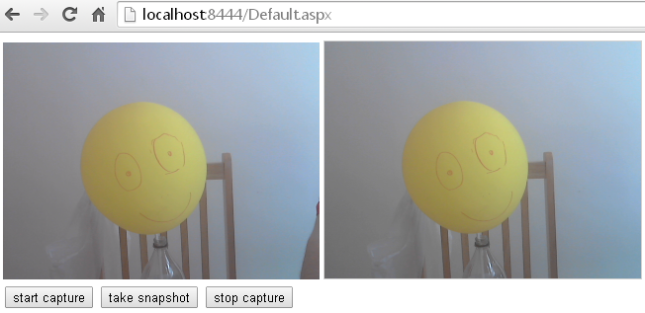
The result:
Let’s review the arguments (skipping the first ‘video’ argument):
- The first pair are the x,y of the starting points of the source.
- The second pair are the width and height of the source.
- The third pair are the x,y of the starting points of the target canvas (these can be greater than zero, for example if you would like to have some padding).
- The fourth pair are the width and height of the target canvas, effectively allowing you also to resize the picture.
Now let’s review the dimensions in our case:
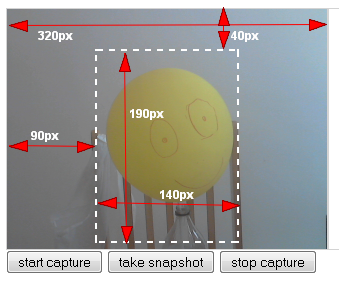
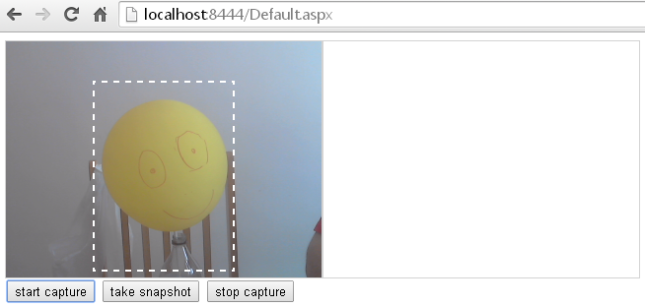
In this example the target area is 140×190 and starts at y=40. As the width of the capture area is 320 and the target area is 140, each margin is 90. So basically we should start cropping at x=90.
But since in the source picture everything is doubled as explained before, the drawImage looks different as the first four arguments are doubled:
function takePhoto() {
    if (localMediaStream) {
        var ctx = canvas.getContext('2d');
        //ctx.drawImage(video, 0, 0, 320, 240); // original draw image
        //ctx.drawImage(video, 0, 0, 640, 480, 0, 0, 320, 240); // entire image

        //instead of using the requested dimensions "as is"
        //ctx.drawImage(video, 90, 40, 140, 190, 0, 0, 140, 190);

        // we double the source args but not the target args
        ctx.drawImage(video, 180, 80, 280, 380, 0, 0, 140, 190);
    }
}
The result:
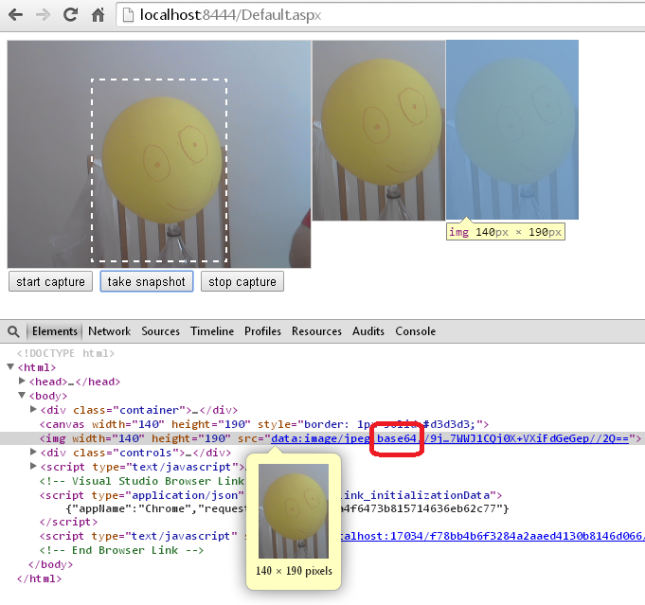
Step 4: Upload the result to the server.
Finally we would like to upload the cropped result to the server. For this purpose we will take the image from the canvas and set it as a source of an img tag.
<!DOCTYPE html>
<html>
<head>
    <title></title>
    <style type="text/css">
        .container {
            width: 320px;
            height: 240px;
            position: relative;
            border: 1px solid #d3d3d3;
            float: left;
        }

        .container video {
            width: 100%;
            height: 100%;
            position: absolute;
        }

        .container .photoArea {
            border: 2px dashed white;
            width: 140px;
            height: 190px;
            position: relative;
            margin: 0 auto;
            top: 40px;
        }

        canvas, img {
            float: left;
        }

        .controls {
            clear: both;
        }
    </style>
</head>
<body>
    <div class="container">
        <video autoplay></video>
        <div class="photoArea"></div>
    </div>
    <canvas width='140' height='190' style="border: 1px solid #d3d3d3;"></canvas>
    <img width="140" height="190" />
    <div class="controls">
        <input type="button" value="start capture" onclick="startCapture()" />
        <input type="button" value="take snapshot" onclick="takePhoto()" />
        <input type="button" value="stop capture" onclick="stopCapture()" />
    </div>
    <script type="text/javascript">
        var localMediaStream = null;
        var video = document.querySelector('video');
        var canvas = document.querySelector('canvas');

        function takePhoto() {
            if (localMediaStream) {
                var ctx = canvas.getContext('2d');
                //ctx.drawImage(video, 0, 0, 320, 240); // original draw image
                //ctx.drawImage(video, 0, 0, 640, 480, 0, 0, 320, 240); // entire image

                //instead of
                //ctx.drawImage(video, 90, 40, 140, 190, 0, 0, 140, 190);

                // we double the source coordinates
                ctx.drawImage(video, 180, 80, 280, 380, 0, 0, 140, 190);
                document.querySelector('img').src = canvas.toDataURL('image/jpeg');
            }
        }

        navigator.getUserMedia = navigator.getUserMedia || navigator.webkitGetUserMedia || navigator.mozGetUserMedia || navigator.msGetUserMedia;
        window.URL = window.URL || window.webkitURL;

        function startCapture() {
            navigator.getUserMedia({ video: true }, function (stream) {
                video.src = window.URL.createObjectURL(stream);
                localMediaStream = stream;
            }, function (e) {
                console.log(e);
            });
        }

        function stopCapture() {
            video.pause();
            localMediaStream.stop();
        }
    </script>
</body>
</html>
- Lines 43-44: Note that the canvas has been resized to the desired image size, and the new img element is also resized to those dimensions. If we don’t match them we might see the cropped image stretched or resized not according to the desired dimensions.
- Line 66: We instruct the canvas to return a jpeg as a source for the image (other image formats are also possible, but this is off topic).
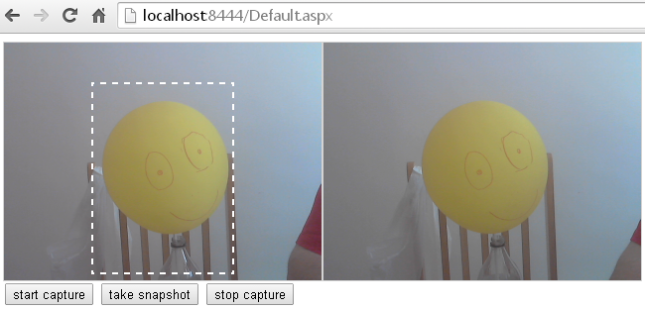
This is how it looks like. The video is on the left, the canvas is in the middle and the new img is to the right (it is masked with blue because of the debugger inspection). It is important to notice the debugger, which shows that the source image is a base64 string.
Now we can add a button to upload the base64 string to the server. The example uses ASP.NET PageMethods but obviously you can pick whatever is convenient for yourself. The client code:
<!DOCTYPE html>
<html>
<head>
    <title></title>
    <style type="text/css">
        .container {
            width: 320px;
            height: 240px;
            position: relative;
            border: 1px solid #d3d3d3;
            float: left;
        }

        .container video {
            width: 100%;
            height: 100%;
            position: absolute;
        }

        .container .photoArea {
            border: 2px dashed white;
            width: 140px;
            height: 190px;
            position: relative;
            margin: 0 auto;
            top: 40px;
        }

        canvas, img {
            float: left;
        }

        .controls {
            clear: both;
        }
    </style>
</head>
<body>
    <form runat="server">
        <asp:ScriptManager runat="server" EnablePageMethods="true"></asp:ScriptManager>
    </form>
    <div class="container">
        <video autoplay></video>
        <div class="photoArea"></div>
    </div>
    <canvas width='140' height='190' style="border: 1px solid #d3d3d3;"></canvas>
    <img width="140" height="190" />
    <div class="controls">
        <input type="button" value="start capture" onclick="startCapture()" />
        <input type="button" value="take snapshot" onclick="takePhoto()" />
        <input type="button" value="stop capture" onclick="stopCapture()" />
        <input type="button" value="upload" onclick="upload()" />
    </div>
    <script type="text/javascript">
        var localMediaStream = null;
        var video = document.querySelector('video');
        var canvas = document.querySelector('canvas');

        function upload() {
            var base64 = document.querySelector('img').src;
            PageMethods.Upload(base64,
                function () { /* TODO: do something for success */ },
                function (e) { console.log(e); }
            );
        }

        function takePhoto() {
            if (localMediaStream) {
                var ctx = canvas.getContext('2d');
                //ctx.drawImage(video, 0, 0, 320, 240); // original draw image
                //ctx.drawImage(video, 0, 0, 640, 480, 0, 0, 320, 240); // entire image

                //instead of
                //ctx.drawImage(video, 90, 40, 140, 190, 0, 0, 140, 190);

                // we double the source coordinates
                ctx.drawImage(video, 180, 80, 280, 380, 0, 0, 140, 190);
                document.querySelector('img').src = canvas.toDataURL('image/jpeg');
            }
        }

        navigator.getUserMedia = navigator.getUserMedia || navigator.webkitGetUserMedia || navigator.mozGetUserMedia || navigator.msGetUserMedia;
        window.URL = window.URL || window.webkitURL;

        function startCapture() {
            navigator.getUserMedia({ video: true }, function (stream) {
                video.src = window.URL.createObjectURL(stream);
                localMediaStream = stream;
            }, function (e) {
                console.log(e);
            });
        }

        function stopCapture() {
            video.pause();
            localMediaStream.stop();
        }
    </script>
</body>
</html>
- Line 40: PageMethods support.
- Line 60-61: Get the base64 string from the image and call the proxy Upload method.
The server side:
public partial class _Default : System.Web.UI.Page
{
    [WebMethod]
    public static void Upload(string base64)
    {
        var parts = base64.Split(new char[] { ',' }, 2);
        var bytes = Convert.FromBase64String(parts[1]);
        var path = HttpContext.Current.Server.MapPath(string.Format("~/{0}.jpg", DateTime.Now.Ticks));
        System.IO.File.WriteAllBytes(path, bytes);
    }
}
- Line 6: As can be seen in the client debugger above, the base64 has a prefix. So we parse the string on the server side into two sections, separating the prefix metadata from the image data.
- Line 7: Into bytes.
- Lines 8-9: Save to a local photo. Replace with whatever you need, such as storing in the DB.
Addendum
There are several considerations you should think of:
- What happens if the camera provides a source of different dimensions?
- Browsers that do not support these capabilities.
- The quality of the image. You can use other formats and get a better photo quality (at the price of a larger byte size).
- You might be required to clear the ‘src’ attribute of the video and or img elements, if you need to reset them towards taking a new photo and ensuring a “fresh state” of these elements.


